HTML integration
LaunchList widget works seamlessly with the HTML page. This method works on all sites. You can use the Embed widget or build your form to integrate the widget. Follow the below guide to integrate the widget.
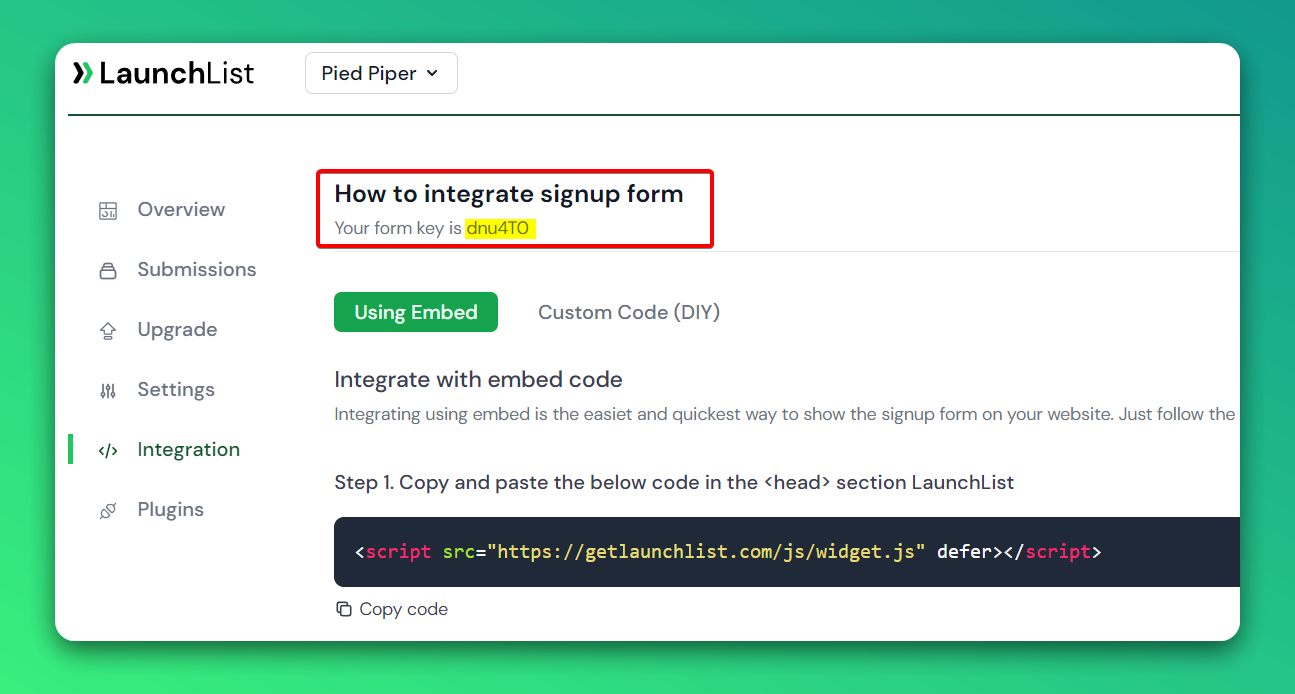
Step 0 - Get form key
To integrate the embed widget on the HTML website, first, you need a LaunchList form key which you can get from integration page.

Embed Widget
Step 1 - Add a widget script into <head> section of your website
- Add the below script into the
<head>section.
<script src="https://getlaunchlist.com/js/widget.js" defer></script>
Step 2 - Add the form code where you want to display the form
- Make sure you have replaced the FORM_KEY with your key from step 0 in the below code
<div class="launchlist-widget" data-key-id="FORM_KEY" data-height="180px"></div>
Once set up, you'll see instantly see the widget on your website.
Codepen embed widget example
Custom Form
Step 1 - Add a widget script into <head> section of your website
- Add the below script into the
<head>section.
<script src="https://getlaunchlist.com/js/widget-diy.js" defer></script>
Step 2 - Build your form
- Customize the form with your CSS
- You can add multiple input fields if want to collect extra details
- Make sure your form has a class name "launchlist-form" and the method is set to "POST"
- Make sure you have replaced the FORM_KEY with your key from step 0 in the below code
<form class="launchlist-form" action="https://getlaunchlist.com/s/FORM_KEY" method="POST">

    <input name="name" type="text" placeholder="Enter your name" />
    <input name="email" type="email" placeholder="Enter your email" />

    <button type="submit">Join Waitlist</button>

</form>
Once set up, you'll see instantly see the widget on your website.
Codepen custom code example
Popup
Step 1 - Add a widget script into <head> section of your website
- Add the below scripts into the
<head>section. - widget-diy.js is used to handle referrals.
- popup.js create the popup modal.
<script src="https://getlaunchlist.com/js/widget-diy.js" defer></script>
<script src="https://getlaunchlist.com/js/popup.js" defer></script>
Step 2 - Build your form
- Customize the form with your CSS
- You can add multiple input fields if want to collect extra details
- Make sure your form has a class name "launchlist-form-popup" and the method is set to "POST"
- Make sure you have replaced the FORM_KEY with your key from step 0 in the below code
<form class="launchlist-form-popup" action="https://getlaunchlist.com/s/FORM_KEY" method="POST">

    <input name="name" type="text" placeholder="Enter your name" />
    <input name="email" type="email" placeholder="Enter your email" />

    <button type="submit">Join Waitlist</button>

</form>
Step 2 - Add Javascript to handle submission
- Add the below javascript code before
</body>
// get all forms. This is to handle multiple forms in the same page
let forms = document.querySelectorAll(".launchlist-form-popup");
// submit form
forms.forEach((form) => {
    form.addEventListener("submit", function (e) {
        e.preventDefault();

        // Get the action url of the form
        let action = form.getAttribute("action");

        // Get the form data
        let formData = new FormData(form);

        // Submit the form
        fetch(action, {
            method: "POST",
            body: formData,
            headers: {
                Accept: "application/json"
            }
        })
        .then((response) => response.json())
        .then((data) => {
            console.log(data);
            if (data.ok) {
                // replace iframe src
                let iframe = document.querySelector(".launchlist-iframe");
                iframe.src = data.embeddedLink;
                // show modal
                toggleModal();
            } else {
                // You can catch error here
                // alert(data.error);
            }
        })
        .catch((error) => {
            // You can catch error here
        });
    });
});
Once set up, you'll see instantly see the widget on your website.
Codepen custom code example