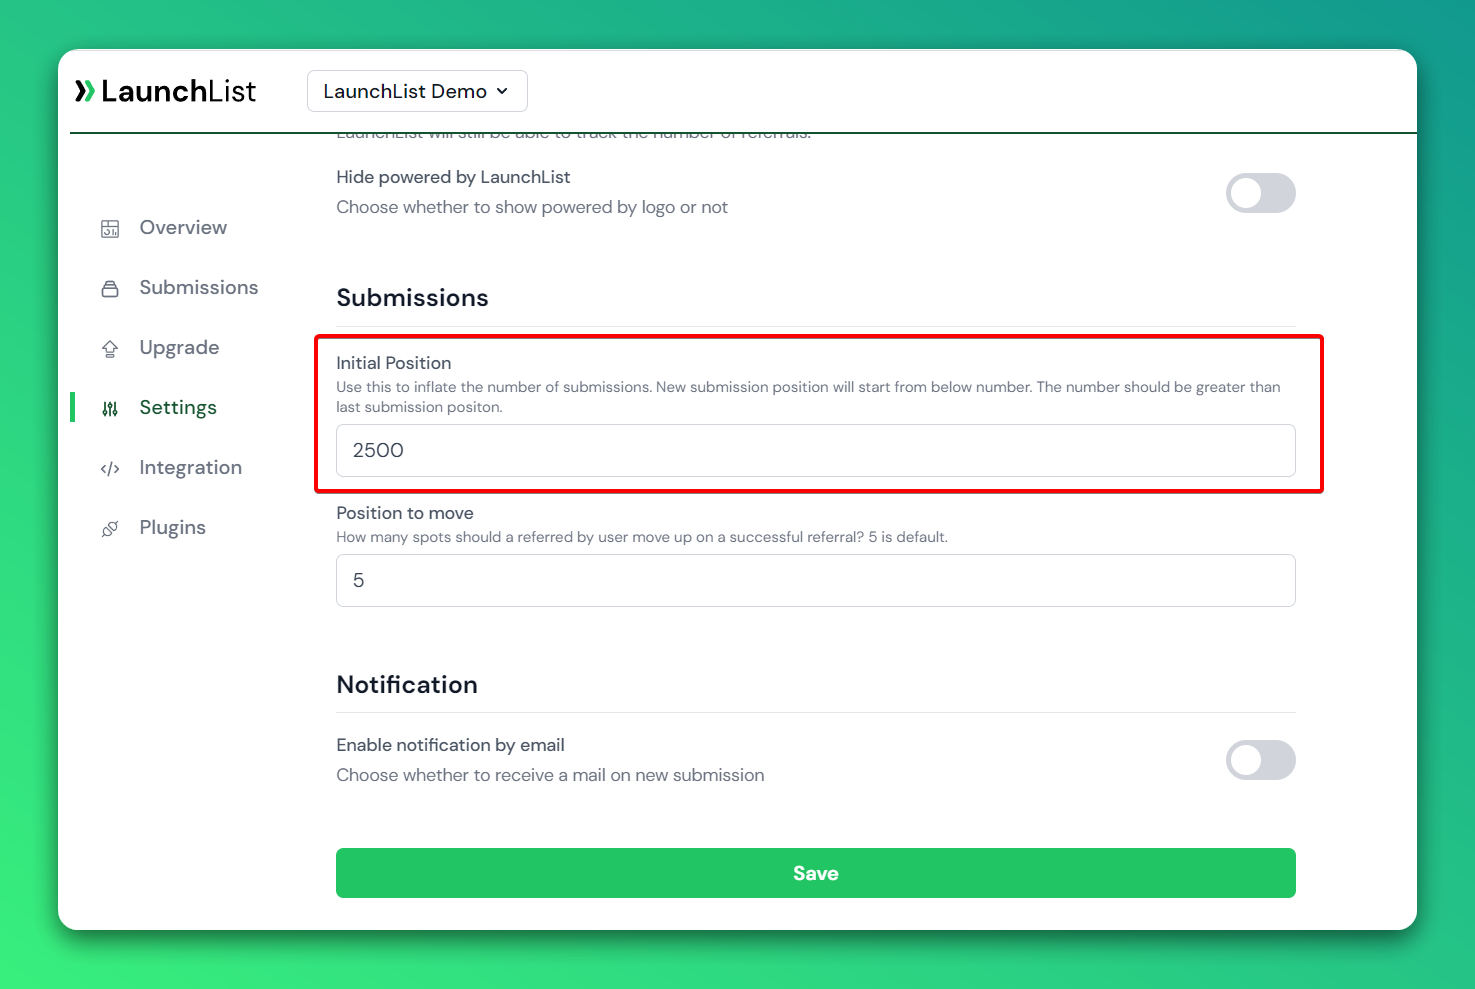
No one likes an empty waitlist. Now, easily modify the initial position from your waitlist settings. The new submission position will start from the below number. The number should be greater than the last submission position.
What's New
New updates and improvements to LaunchList.
New Features
Add trackers on Thank you page
If you want to monitor conversions on your landing page, we have developed a tracking code that can be inserted into the <head> section. This code allows you to easily incorporate Google Analytics, Ads Conversion, LinkedIn ads, or any other tracking service onto your Thank You page.
To add the tracking code, simply access your waitlist settings page and locate the code in the Customize thank you page section. Paste the code and save your changes. Your tracking will then be implemented on the thank you page.
If you want to monitor conversions on your landing page, we have developed a tracking code that can be inserted into the <head> section. This code allows you to easily incorporate Google Analytics, Ads Conversion, LinkedIn ads, or any other tracking service onto your Thank You page.
To add the tracking code, simply access your waitlist settings page and locate the code in the Customize thank you page section. Paste the code and save your changes. Your tracking will then be implemented on the thank you page.
New Features
.png)
Webhook is now live! 🔔
Webhook is the most requested feature on LaunchList. We have received a lot of messages to integrate the webhook to take user data when a user signs up. So, we pushed our earlier plan to add webhooks to the highest priority.
Webhook is now active on your waitlist. You can find the webhook settings on your waitlist page on the Plugins page.
Currently, you can use webhook to get notified when a new user signs up. In the future, we will add support to get notified when the user confirms their email and when the user's position changes.
Play around with Webhook and please share your feedback.
Webhook is the most requested feature on LaunchList. We have received a lot of messages to integrate the webhook to take user data when a user signs up. So, we pushed our earlier plan to add webhooks to the highest priority.
Webhook is now active on your waitlist. You can find the webhook settings on your waitlist page on the Plugins page.
Currently, you can use webhook to get notified when a new user signs up. In the future, we will add support to get notified when the user confirms their email and when the user's position changes.
Play around with Webhook and please share your feedback.
New Features
.png)
Connect Slack to get new user details instantly
Go to the integration page to connect your Slack and get a notification whenever a new user signs up.
Go to the integration page to connect your Slack and get a notification whenever a new user signs up.
New Features
Integrate widget with custom code (Do it yourself)
Some users requested a way to customize the UI/UX of the widget. We understand every website has its own design guidelines to follow. An embed using iframe has a limited number of customization.
If you want complete control over the widget, follow the below steps to learn how to add a widget using custom code. Or head over to your waitlist integration page.
Step 1 - Create your form and replace the form's action endpoint with the one below. Make sure your form has a class name
launchlist-form and method is set to "POST"
<form class="launchlist-form" action="http://getlaunchlist.com/s/PUBLIC_KEY" method="POST">
Replace the PUBLIC_KEY with your waitlist key. You can find your waitlist key on the integration page.
Step 2 - Create an input to collect name and email.
<input name="name" type="text"> <input name="email" type="email">
Step 3. Add some JS to the head so we can track the referrals.
Some users requested a way to customize the UI/UX of the widget. We understand every website has its own design guidelines to follow. An embed using iframe has a limited number of customization.
If you want complete control over the widget, follow the below steps to learn how to add a widget using custom code. Or head over to your waitlist integration page.
Step 1 - Create your form and replace the form's action endpoint with the one below. Make sure your form has a class name
launchlist-form and method is set to "POST"
<form class="launchlist-form" action="http://getlaunchlist.com/s/PUBLIC_KEY" method="POST">
Replace the PUBLIC_KEY with your waitlist key. You can find your waitlist key on the integration page.
Step 2 - Create an input to collect name and email.
<input name="name" type="text"> <input name="email" type="email">
Step 3. Add some JS to the head so we can track the referrals.
Improvements
Integrate widget using Embed
We made the widget faster⚡You can now use the iFrame to integrate the widget.
- Quick to load
- Easy to customize
- Work on any framework without depending upon the framework
How to use it?
- Paste the widget script in the `<head>` section of your page
<script src="http://getlaunchlist.com/js/widget.js" defer></script>
- Paste the following code anywhere on your page where you want to display the form
<div class="launchlist-widget" data-key-id="PUBLIC_KEY"></div>
Replace the `PUBLIC_KEY` with your waitlist key. You can find your waitlist key on the integration page.
We made the widget faster⚡You can now use the iFrame to integrate the widget.
- Quick to load
- Easy to customize
- Work on any framework without depending upon the framework
How to use it?
- Paste the widget script in the `<head>` section of your page
<script src="http://getlaunchlist.com/js/widget.js" defer></script>
- Paste the following code anywhere on your page where you want to display the form
<div class="launchlist-widget" data-key-id="PUBLIC_KEY"></div>
Replace the `PUBLIC_KEY` with your waitlist key. You can find your waitlist key on the integration page.
Improvements
.png)
View user details from dashboard
View user location, browser, device, platform, language, timezone, and more from your dashboard. Head over to your waitlist submissions page and click on the email address to view user details in the popup.
View user location, browser, device, platform, language, timezone, and more from your dashboard. Head over to your waitlist submissions page and click on the email address to view user details in the popup.
Ready to grow your idea?
Integrate waitlist form on your website in just 5 minutes
Integrate waitlist
Free for first 100 submissions
No credit card required
Lifetime access
Live chat support